
WELCOME TO
JEWELED INTERIORS!
Hello there! If we haven’t met yet, my name is Jewel, and I have a passsion for making the world a prettier place, one room or party at a time. I am a firm believer that high-end looks can be achieved with a little ingenuity and creativity…no small fortune required. It’s a good thing too, because in August we just moved into our 12TH HOUSE! Believe it or not, I only have 8.5 months left to make this rental house a home before we make our next big military move. Yes, you read that correctly…8.5 months left in this 10 month rental. YIKES!

ORC UPDATES
Speaking of time speeding by quickly, we are already into week TWO of the Fall 2017 One Room Challenge. To be honest, I’m excited because I’ve already knocked out a couple of major projects. Woot, woot! BUT WAIT! I shouldn’t get too confident. This large room has a LONG way to go.
If you missed last week’s post let me give you the Reader’s Digest version of my ORC great-room makeover. I’m aiming for a mash-up of modern and antique/vintage all tied up in a glamorous little bow. Click here for more deets.
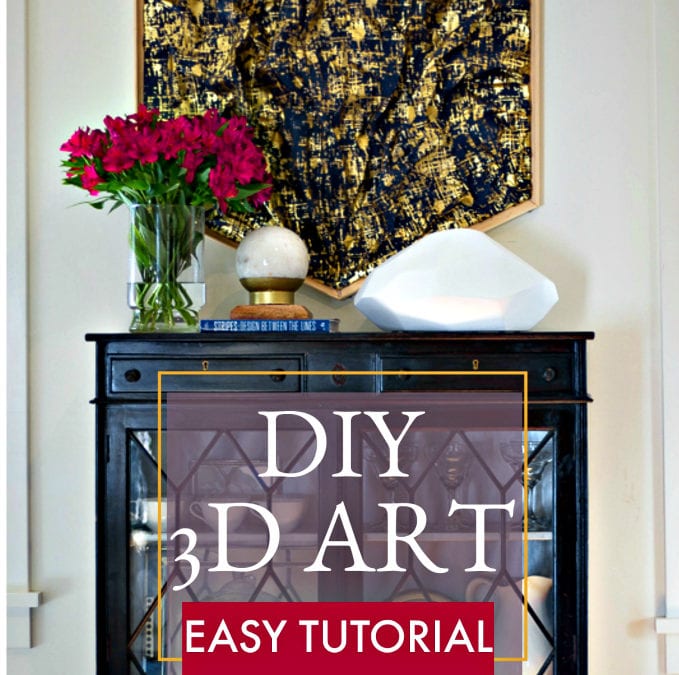
For this area of the room I have a lovely Victorian bookcase that I brought home from my short-lived stint as an amateur antiques dealer in the UK. I adore its classic lines and leaded-glass front.
To prove the timelessness and relevancy of this piece, I wanted to juxtapose it with something uber-modern. Perhaps it is due in part to my recent crushings on cubist art and sculpture, but I had the inspiration to make this piece 3D. Yep, like any good man it needs to be attractive, yet have character and depth…literally. For bonus points, I also wanted to mimic the hexagon shape in the leaded glass.

The diamond dimensions actually remind me of the Hexagon mirror I have been eyeing from West Elm. This will have to remain eye candy though. I already spent my mirror budget for my mantle.

Speaking of budget, I have very few funds left to spend after all of the other splurges in the room. This project had to happen for less than $30. Challenge accepted.
I gathered up some supplies I have around the house and let the creative juices start flowing.
STEP 1: Gather Supplies

Gather Supplies
- Plywood
- Picture hanging hardware
- Paper boxes
- Hot glue
- Pretty paper (I recommend this style from Homegoods, but Papersource has some stunning options as well)
- Pencil
- Measuring tape
- Saw of some sort
- Protractor
- Wood trim (enough for the perimeter of your shape, plus extra)
- Super Glue or fast drying wood glue
- Optional: Flat or gloss spray paint or fabric stiffener
STEP 2: Cut the Plywood
Determine what shape and size you would like. The sky is the limit here folks. Nothing says it has to be symetrical, and cutting the trim may actually be easier if it isn’t.
For me, however, I wanted to match the diamond in the leaded glass bookcase. I simply measured a square and then two equal mid-points above and below. Measure twice, cut once.
Get out your saw and get to cutting. I used my jig saw for this one, only because it was the best option of my entire saw collection…of two saws.
My fancy paper did a dress rehearsal. Yep, looking so glam. Perhaps a little too glam? This is the point where I started to investigate options to tone down the sheen of the gold.


STEP 3: Attach Hardware
Time to attach the picture-hanging hardware of your choice. I opted to use these screws with wire. I’m so glad that I remembered to attach this BEFORE the next step. It would have been messy business otherwise.

STEP 4: Build Framework
Now you get to set up the “skeleton” of your art. Yep, give this bad boy a backbone by using old cereal boxes (yes, I said cereal boxes) and hot glue. I threw in some Elmers glue for good measure.


In the second photo you can see that I had to hot glue several sheets together to fit across my huge diamond. I wish I would have done this before attempting to attach it to the board.
STEP 5: Crunch time
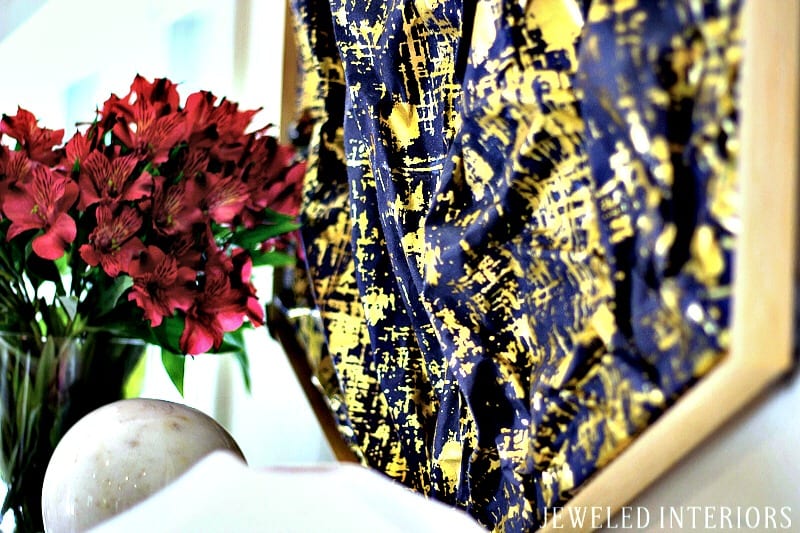
Now that I built up some structure on the board and ensured that my paper was wide enough it was time for the fun part…scrunching and hot gluing. Doesn’t it just sound like a riot? I felt like I was being so destructive, but this type of paper could withstand a little manhandling.


I worked in sections and glued as I went. I basically started around the center and left the corners for the end. To polish off this section I hot glued all over-hang behind the board.
Once attached I decided it was too shiny. I took it outside and spray painted it with flat spray paint.
STEP 6: Cut the Trim
I have to be honest with you here. Due to the fact that the paper wrapped around each corner and the angles were not going to be perfectly symetrical we (“we” as in my handsome husband who saw me struggling with my miter saw) opted to use the ol’ eyeball technique. I have to say that eyeballing was much more accurate than I would have feared.


STEP 7: Attach the Trim

I considered stapling, screwing, or nailing the trim but had a healthy fear of smushing the entire front of the project. Instead, I opted to set the art in the frame (held together temporarily by tape, mind you) and super glue along all seams. I added some heavy objects along said seams to ensure consistent contact. After several hours (it may be more or less depending on your glue) I had a finished work of art!
STEP 8: Enjoy
I’m completely thrilled with the beauty, texture, graphic appeal, oh..and price of this piece. I would love to hear what you think! Does this inspire anyone else to “get their craft on”?


I want to personally give a HUGE thanks to Linda from Calling it home. She is the mastermind behind the web-wide famous One Room Challenge. Make sure you head over to her blog to check out all of the fun progress being made by almost 200 other bloggers.

Questions? Comments? I would love to hear from you. Please feel free to leave me a message below.
-xoxo Jewel
Let's be Friends


what a dramatic statement and it’s DIY!!! Looking forward to see what you are up to next!
Thanks Tim! I’m loving the wallpaper over at your place!