

I have to admit something to you. Now, it’s a secret that any self respecting interior design/DIY blogger should probably be embarrassed about. Instead of hiding this skeleton in the closet, however, I proudly parade it out for all of the world to know…wait for it… I have DESTROYED not one, not two, but THREE sofas… That’s right, three epic Pinterest fails ?.
There was the time I screwed up the Parker-Knoll settee with fabric paint medium. Oh, and the time I unsuccessfully tried to Ritz dye the red velvet thrift store beauty….and who can forget the time I took a beautiful vintage silk sofa and slathered it in wood stain (it stunk up my garage for weeks before being thrown away). Now, my track record isn’t all bad. I’ve successfully reupholstered and refinished at least three sofas and hundreds of chairs. With this diversified resume I consider myself a bit of an expert when it comes to destroying and not destroying furniture. I am willing to take the risks so that you don’t have to…. and you’re welcome.
So there are very few things more exciting to me than walking though the upholstery section of a fabric store. Let’s get real though. Reupholstering a piece of furniture takes time and money ? ? . In today’s post I’m going to teach you this uber-inexpensive trick I used to transform some tan (womp womp) Craigslist chairs into vibrant, yet sophisticated show stoppers (yhasss).
Oh wait…If you want to get caught up on the ORC room so far click here?
Week 1 | Week 2 | Week 3 | Week 4 | Week 5 | Week 6 THE BIG REVEAL!
What is the ORC?

I want to start out with a huge thank you to Linda, from Calling it Home, for organizing this link-up of all link-ups, the crack-cocaine of all blogging events…The One Room Challenge.
Never heard of it? Well come on out from under that rock and let me set you straight. This is a 6 week competition between 20 “Challenge Participants” and hundreds of other “Guest Participants” (like me). All of us have the goal of transforming our spaces with only a month and a half to get it done…(Wait…week three is half way to the end ?!!!). As an added bonus there are two great media sponsors for this event, House Beautiful and Old Home Love, who will be picking their favorites to showcase. It’s all so…what’s the word…CRAZY?…MASOCHISTIC?…EXCITING!
So Glad You are Here
If you are new around these parts then I am stoked you have popped into the crazy zone. ✋. You see, we are a military family of 6 and we move A LOT! Yep, this is our 12th home and it’s only a 10 month rental…yep rental… After you are done checking out the other fun ORC participant rooms come back and see our Spring house tour. When you move around so much that you can’t keep your zip code straight then you become an expert at setting up shop quickly and beautifully. So I guess that is why the ORC sounds bizarrely fun yet strangely familiar. This will be my second time on the Space Mountain-like ORC Challenge and I thrive on the fun competition and inspiration from others.

How to Paint your Chairs
Supplies
Vacuum
Paint in flat finish (I used a good quality sample sized paint tub per chair) You may want to pick up an extra one just in case
Disposable container or bucket
Clean 2 inch brush
Plaster of Paris
Drop cloth or other protection for your floors
Water
Optional: Wax
I know that some people recomend finishing with clear wax, especially on velvet. I don’t think I will on this project because the finish is natural feeling and I may want to repaint them after our upcoming move.
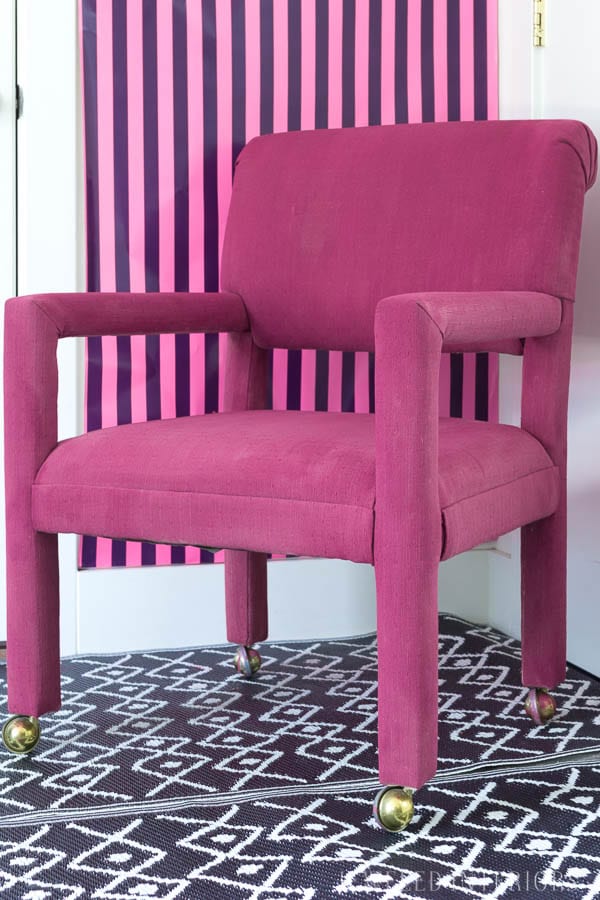
Before
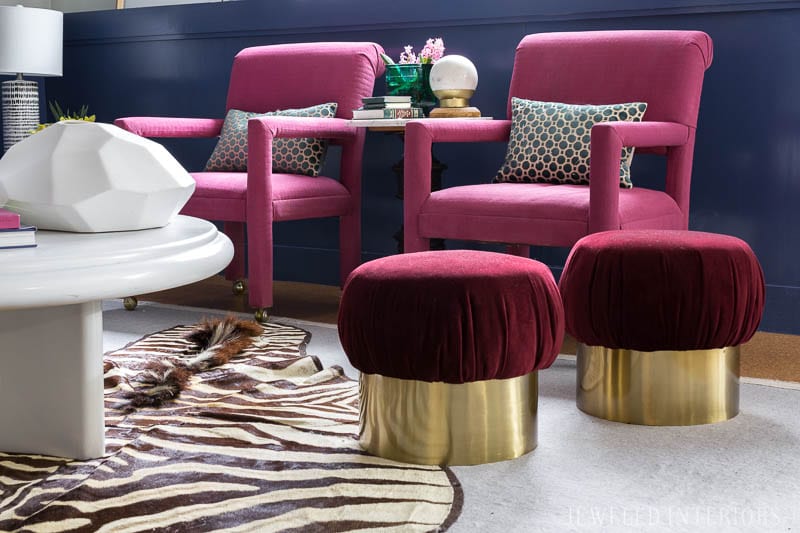
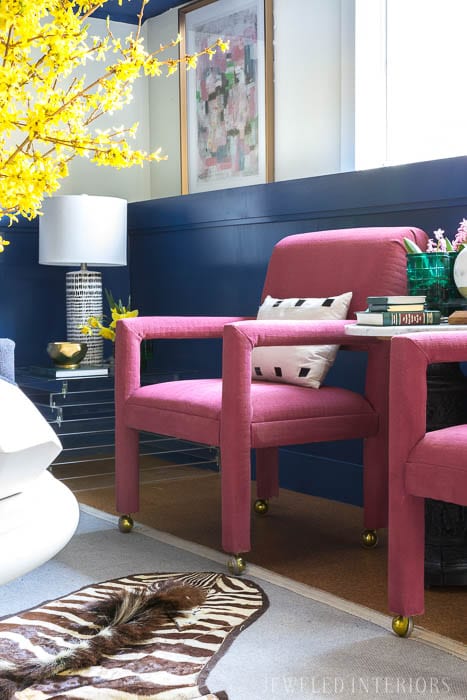
I drove up to Boston to snag these ohhh so sexy-80’s chairs. I think it’s the upholstered arms that got me…but I smiled all the way home.
some products mentioned in this post are sponsored, but the opinions are 100% my own.

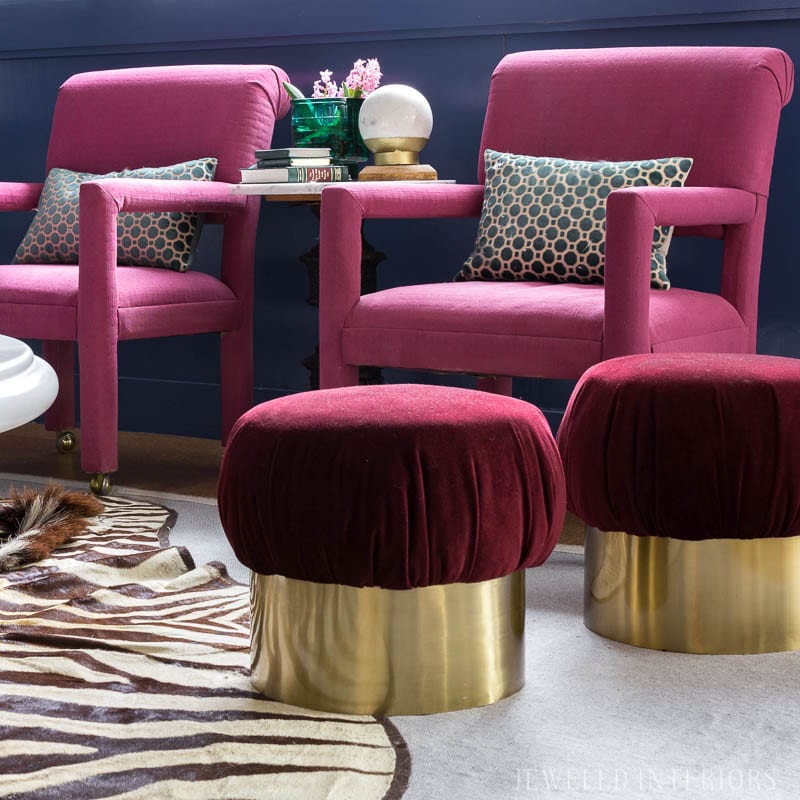
I know…They don’t look that exciting yet, but they were the perfect scale for the space and I knew the rocked the second I brought them in.
These chairs were the perfect candidates for painting
1. The existing fabric was in great condition
2. The color was lighter than than my desired color
3. The current fabric was a smooth, tight, finish- No chunky weave
4. The chairs have no button tufting or nail head
All of these have proven to be factors in other projects I have destroyed attempted
Getting to Work
Recipe:
About 1 part paint to 1 part Plaster of Paris to about 6-10 parts water
Here is the deal though folks. This recipe isn’t a hard science. No need to pull out your measuring cups on this. Instead of stressing over the amount of each of the three ingredients, let me teach you the properties of each.
Paint: This acts as your pigment or dye. If you are going from dark to light you may need more paint in the ratio. The more paint in the ratio the more even yet more crunchy each coat becomes.
Plaster of Paris: This keeps the paint flexible. It also dilutes the intensity of the color (makes it lighter)
Water: Water is important because it is the medium to hold the other two ingredients and keeps the mixture from drying too thick and crunchy. The runnier the mixture the less intense the color, and less crunchy it becomes. Too much water equals more coats required.
Knowing these guiding principles you can use common sense to decide if your mixture is working with whatever type of fabric you are tackling.
Example: I’m considering using the same technique for some white silk chairs in the room. If I attempt this project I plan to use a very high water ratio because I want to just barely tint the chairs vs made them dark and dramatic.

Now that you know my ice cream flavor of choice you can see that this is the perfect disposable container for this project. It even comes complete with a lid! ‘Nuf said. I mean, do we really need another excuse to eat ice cream?
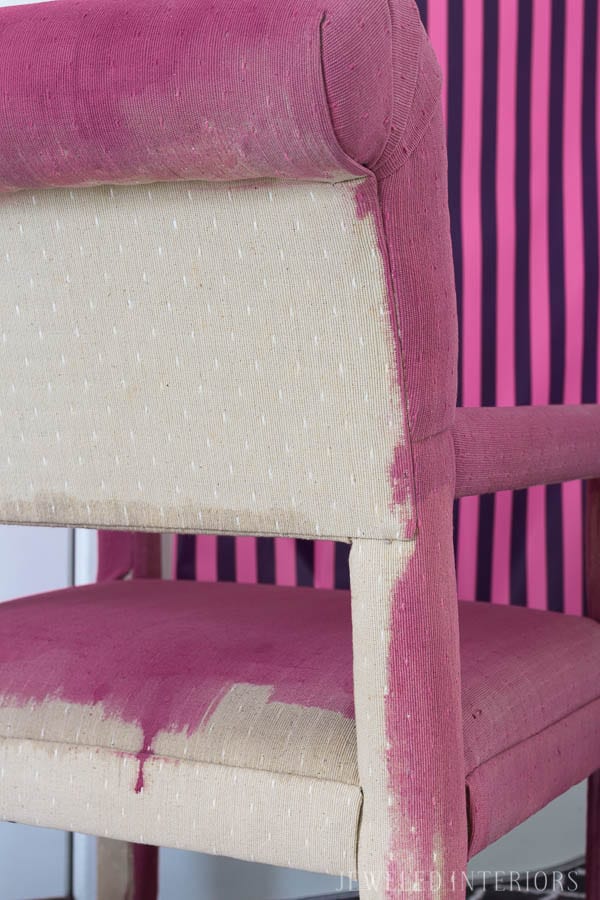
Can you see how the paint is super runny? Think of it more as a dye vs a paint. I used a 2 inch brush to apply the mixture with the direction of the fabric. Make sure to really get into each of the crevices with your brush.
After First Coat
Not bad, eh? I let it dry for 24 hours and then did a second coat. If you find that your concoction has dried more like paint than dye you can use sandpaper to get it smooth. I used enough water that mine didn’t feel anything like paint, especially on the first coat.
After Second Coat
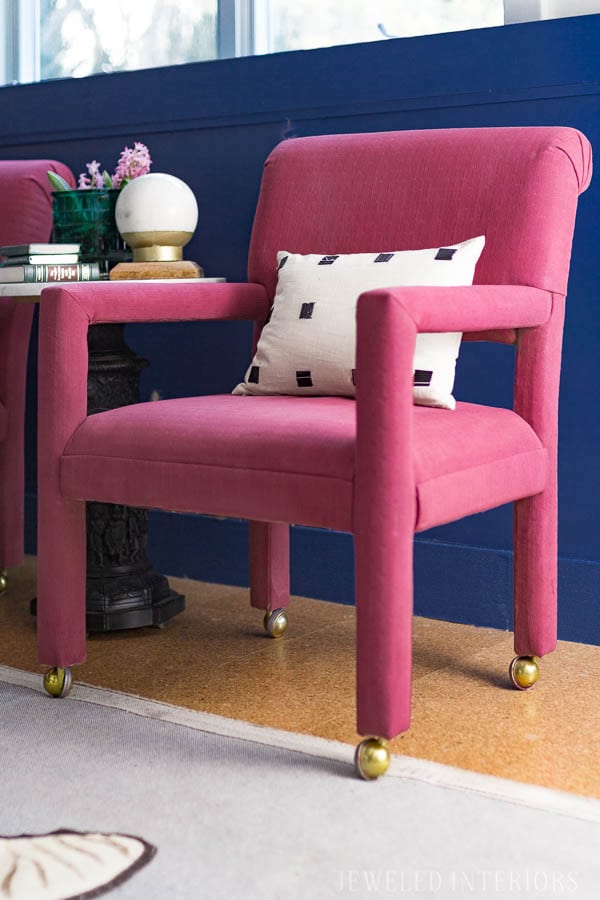
Lookin’ good, right? The second coat dried SLIGHTLY stiff, but I can tell already that the fabric will relax quickly.
Things Left to Do
Note: some of these products are sponsored, but the opinions are 100% my own.
Paint these Chairs?
I got this set of six silk chairs off of Craigslist and I am strangely attracted to the shell back and upholstered legs. Not only are they unique, they make my bum happy…nice and comfy for sure. I bought them from a 1st Dibs dealer in Boston who decided that they didn’t make the cut. Fine by me, and I gladly took them off of his hands for $20 a chair.
Now, what color do they want to be when they grow up? ???
Reupholster this Sofa
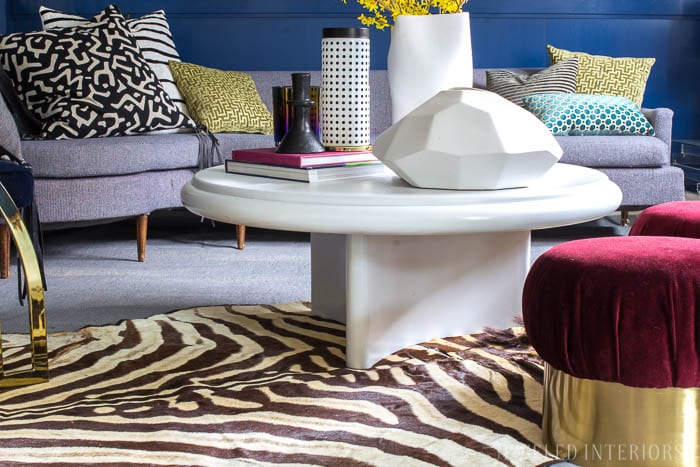
I know, I know, this is a MCM sofa and I was going for pops of 80’s and Art Deco. Here’s the deal though. It’s curvy and sexy and I love it. I really feel that after I upholster it in this stunning terrazzo velvet from Spoonflower.com that you will forgive me.

The curves also help with the Art Deco vibe I’m aiming for.
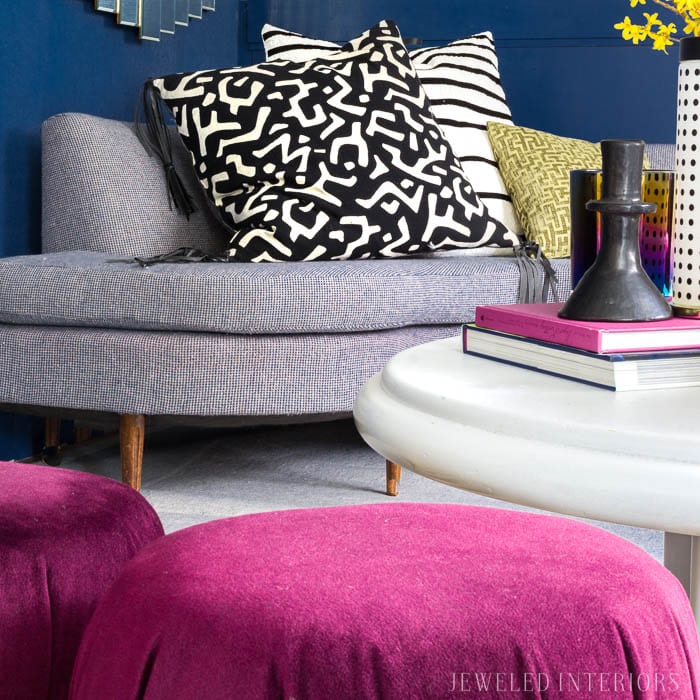
The Fringe
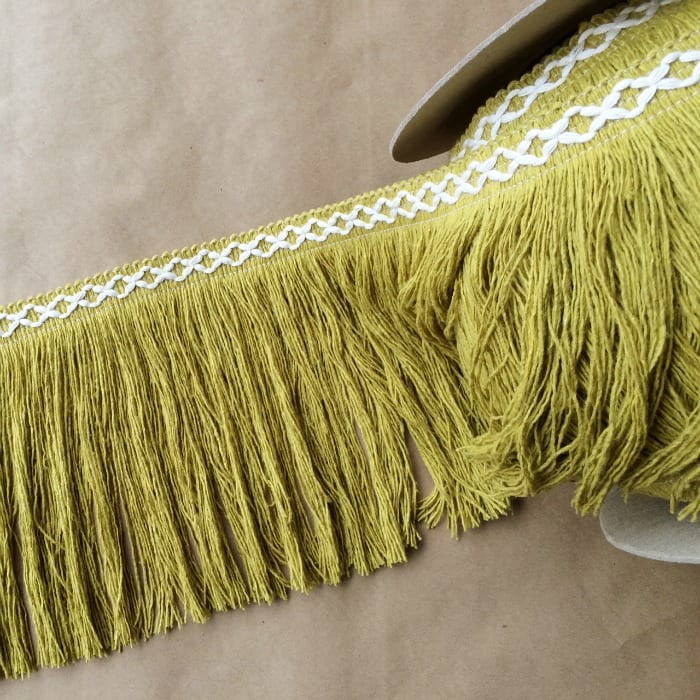
I LOVE me a sofa with fringe! What can I say, it adds sophistication and drama to a space. In this case it’s also going to add functionality. You see, the sofa is too short for the rest of the pieces in the room. I’m going to cut some wood to form a sturdy addition to the bottom of each leg and then use the fringe to cover up my handy work ? . So call me Miles Redd (I mean that would be a very high compliment indeed!) but I’m going to add this gorgeous fringe from Fringe Market to complete my dream sofa.
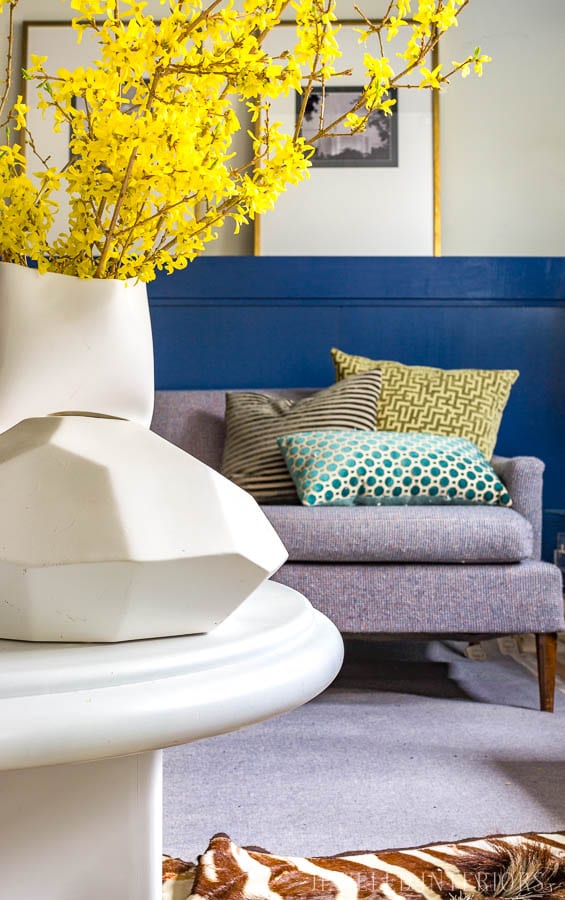
Wallpaper the Top Half of the Walls

Can you see it? Can you picture this moody and dramatic Jungle Tigers Bright Wallpaper designed by Ashley Peterson (IG: @2birdstone Spoonflower: Twobirdstone) up on that half wall?? I seriously can’t wait!!! If you want to shop the rest of this Spoonflower collection click HERE.
Hang this Chandelier

Ok you guys! It was SO HARD to chose a chandelier for this room because the selection at Lamps Plus is expansive and seemingly endless. I came across this spectacular Hudson Valley Buckingham Chandelier. It arrives this Thursday and I will show you all of the deets next week.
Let’s Review the Plan

TO DO LIST
Add furniture
Buy and cut lumber
Buy and paint HIGH GLOSS paint (probably blue…Though purple has crossed my mind)
Add molding to the lower wall
Wallpaper upper wall with the tiger wallpaper (Spoonflower)
Upholster striped chairs- Change the plan: Paint them Pink
Sew fringe on sofa (Fringe Market)
Decide upon, order, and hang chandelier (Lamps Plus)
Style it with pillows etc (Roostery)
Optional:
Wallpaper ceiling (Spoonflower)
Wallpaper entryway (Spoonflower)
Build built-in shelves
Upholster sofa in velvet
Paint dining room shell-chairs
Paint masterpieces
Sleep and good personal hygiene- let’s be honest…That’s not happening

Spoonflower || Roostery || Fringe Market || Lamps Plus
Thank you so very much for joining me on the Spring 2018 One Room Challenge- Week 3 If you like what you see here don’t forget to come back and poke around a bit after visiting the Challenge and Guest participants. Oh, and following me is fun too ?. Don’t forget to come back each week as I show you how to use a limited budget to transform a rental into an unforgettable space.

Whoa!! Love those hot pink chairs. And painted??? Yowza. Great job here, Jewel. The room is already stunning. ~~ Susie from The Chelsea Project
Thanks Susie! This was an easy project. There are still a few tough ones in my future.
You had me at PINK but painted too? I’m pretty much in love with this room. When you are ready to move, let me know and I’ll just move right in!
This is going to be a gorgeous space! I love how those chairs turned out! Great color choice!
Wow, lady, you are going fast! I feel your to-do list is totally achievable at a nice pace. also, those chairs… I mean, you continue to be my DIY hero of all times. They look really good.
LOL! No way girl! I have a gargantuan sofa to reupholster…That will be a time taker for sure.
LOL! Deal!
Boy, I stressed and stressed for days over this color scheme! At one point I had cut out the pink all together and then threw it back in at the last minute. We’ll see if I made the right choice!
Those chairs look amazing, Jewel! And now I’m intrigued…. I just picked up 2 great end of bed benches for my project, but the upholstery is stained. They’re tufted though so that might be a no-go for painting. Might be worth trying anyway…the worst that can happen is that I still need to reupholster them! 😉
That actually looks really good! Man I have seen some bad fabric paint jobs, but you’re right—as more of a dye it’s really nice!
Right? What do you have to lose? A few bucks in paint. ?
Exactly. It’s the water and plaster of Paris that keeps it soft.
I love, love this project Jewel! I must try the plaster of Paris trick as I have also killed off a few pieces of furniture with paint + fabric medium (why I kept trying with that same concoction I have no idea). Love the color you came up with and all the glorious shades going into this room!
Thanks! It worked great on this tight woven light fabric. Let me know if you ever try something darker or looser weave. I’d love to know how it turns out.
Those chairs are amazing! The chairs I painted are a little stiff, so I’ll use some of your tips next time. This room is coming along nicely!
Thanks Ashley. Your space is looking amazing!
I painted a sofa once and I hated it. So I’m glad to hear that you’ve had some disasters as well. There’s a flea market near me that has those same chairs in barstool version and I’m both drawn to them and weirded out by them. The shape is fabulous, but they’re this gross orange color.
Anyways, love your pink chairs!
Everything is just wonderful and yay for fringe. So excited to see this come together.
Fascinating! Are you going to buy them?
I’m loving Fringe Market. Have you checked out their selection? It’s stunning.
The new painted chairs are stunning! That color!! So pretty! Also, can’t wait to see the sofa upholstered with trim. I’m looking for trim myself for the little tufted loveseat I’m using in our ORC space.
Have you tried Fringe Market? There selection is incredible!!!
I am going to try your recipe the next time I paint upholstery…shhhh, yes I have done it too 😉 I am in love with those hot pink chairs!!
Yowza!!! Fabulous – the chairs are amazing and gorgeous!
:). You’ve secret is safe with me!!!
Thanks! I’m excited to see if I can pull the rest of the room together too!?!
Wow I am so impressed with the painted upholstery chairs.! I have always wanted to do this. They turned out great! Excited for the reveal and to see that tiger wall paper.
Thanks Tiffany! The paper came in and I’ve got it up…I may give a sneak peak tomorrow, or I may not?
Ah! I love it!! I’ve always been skeptical about painting upholstery, but your chairs look awesome! I might have to try it out sometime. I also love everything else about this space – especially the fringe 😉
Thanks! I would recommend it on a bench or a chair, but I don’t think I would paint an heirloom sofa. Just truth in advertising 🙂
I’m super excited about the fringe too!!!
Thanks Casey! I’m super excited about the fringe too.